An all-metal finish has a charm of it’s own, and looks great on display. But after building a lot of Metal Earth models, I began thinking about branching out and trying something different with the medium. Experimentation is, after all, one of the joys of any hobby. But what is possible? I had some theories, but I really wanted to find out. Here was my question …
Can you paint Metal Earth models? Yes. You can paint metal models, and get very good results, using a simple 4-step process:
- Sand the metal sheets with a fine sandpaper
- Apply a fine metal primer from a spray can
- Paint all the metal parts while still on their sheets
- Proceed to building from the pre-painted parts
I found that I ran into surprisingly few problems in this test case, which opens up a whole new world of possibilities. But let me outline exactly what I did and show you the results …
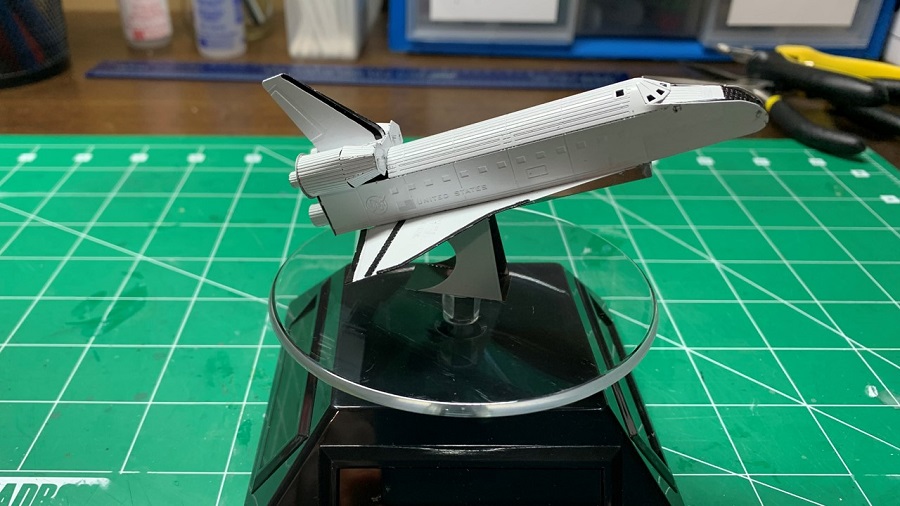
The Metal Earth Model I Chose to Paint
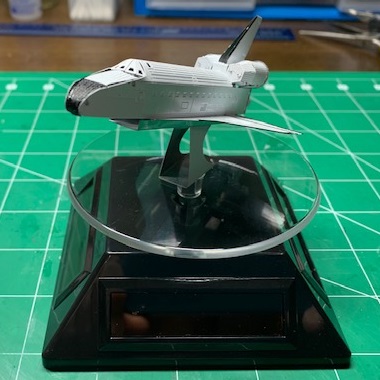
I didn’t have to think too hard about this. I rummaged through my stash, and the Space Shuttle Atlantis kit jumped right out at me as a perfect subject for my experiment …
- It’s a cheap kit. So I wasn’t going to be devastated if I ruined it.
- It’s a quick build. Just one single sheet of metal parts.
- It’s a simple paint job. The real life shuttle is just a 2-color scheme.
- It makes sense to paint it. All of NASA’s shuttles are instantly recognizable for their gloss white surface – not a single natural metal finish among them.
So, with the kit chosen, it was down to work …
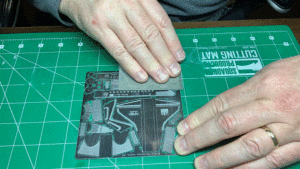
Step 1: Sand the Metal Sheets
As in any painting job, preparation is 90% of your success.
Metal is a very smooth surface, and it will tend to repel paint which needs some roughness to adhere to. I used a fine 400 grit sandpaper, available at any hobby shop (or try your local auto parts store).
Note that you should sand all the parts while they are still together on their metal sheets. Be careful to apply even pressure and sand everything consistently.
With Metal Earth models, you will usually only be painting one side of the sheets (the side with all the etched detail), but you should look over the instructions in case you feel there are any parts that will be visible from both sides that you want to paint.
Step 2: Apply a Fine Metal Primer
I used Tamiya’s Fine Surface Primer (in light grey). And I really recommend it as an excellent product that gave me a perfect finish ready for painting [Click here to get it from Amazon]. One spray can will last you a while, so you can prime quite a few metal models.
I’ve used this primer regularly in my other hobby (plastic scale modeling), and I had thought that it might work well on Metal Earth. But when I picked up the can I noticed it says right on the label: “for plastic and metal”. Funny how I’d never noticed that before, because my interest has always been painting plastic. So, this bolstered my confidence.
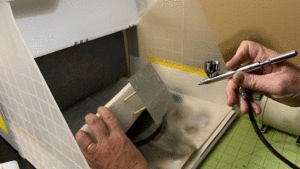
I’m fortunate to have a spray booth that vents out a window, so I was able to do this right in my hobby room. But don’t attempt to use a spray can indoors without proper ventilation. You can do it outside if you need to.
Just one note of caution: watch for dust and hair. This is where I made a rookie mistake. After spraying the metal sheet, I noticed several tiny fibers in the primer coat. Aaaargh!
If this happens to you, don’t panic. Wait for the primer to completely dry and harden, then remove the debris with tweasers as best you can. Then you can very lightly sand the primer back in those spots (again using the 400 grit paper). This fixed it for me so that I didn’t even need to add any more primer.
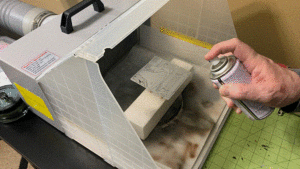
Quick Tip: If you’re not used to using spray cans for painting, don’t just point the can straight at the subject and shoot. That will create “pooling” of the paint and runs. Instead, start spraying off to one side, and then move the flow of spray across the subject in a sweeping motion, always keeping it moving. Don’t pause in any spot.
Step 3: Paint All the Metal Parts on the Sheets
With a good primer coat down, you can immediately see that you have a great base for painting. Note that we’re still not removing any parts. It’s so much easier to just paint them right on their sheets.
When it came to choosing a paint, I chose to stick with Tamiya (I have a lot of Tamiya paints in stock, so it was most convenient). The specific one I used was Tamiya X-2 (gloss white acrylic paint).
Again, I’m fortunate enough to have an airbrush. So, I used that, thinning the paint 1:1 with Tamiya’s acrylic thinner. But if you don’t have an airbrush, you could also use a spray can (Tamiya gloss white comes in a can as well. Click here to get it on Amazon).
Or, you could even paint it with a brush. In fact, I did some of that too, as you’ll see in a moment.
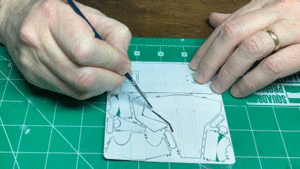
If you Google the space shuttle Atlantis, you’ll get lots of images to work from. It was mostly white, but with black trim around the cockpit and on the wings. I could have masked this off and airbrushed the black trim right over the white. But I wanted to see how handpainting Metal Earth would go as well. So I picked up a brush (and a tin of Tamiya X-18 semi-gloss black).
I don’t claim to be anything close to a great brush painter, but the results I got were very acceptable to me. Anyone who has painted figurines or Warhammer, or the like, will do a much better job than I did. But this really was an experiment, and I was very happy with the outcome.
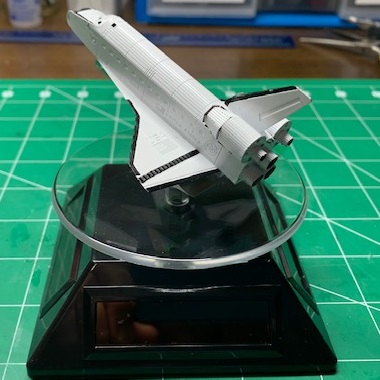
I was also delighted to note that none of the etched detail was lost under primer and paint! It all remained as visible as we’re used to seeing on the bare metal.
Step 4: Proceed to Building
Now we arrive at the familiar process of construction. This is usually the whole process when you’re building a Metal Earth model. But this time it’s just the very last part, after all the painting is done.
I found no real difference from this point on. Some of the tabs were a little harder to insert into their matching slots because the layers of primer and paint had made them a tiny bit thicker. But it wasn’t any great problem. It all went together exactly as it’s supposed to.
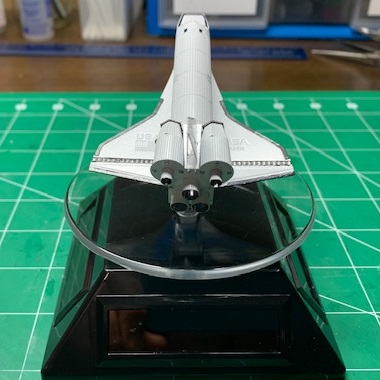
You can check out the results in the pictures and video below.
In Summary
This experiment went really well. The process worked exactly as I had hoped, and the principles that I tested are a proven base now for me to continue to experiment with other models and color schemes. It opens up a whole world of possibilities!
In fact, I have a Metal Earth Lancaster bomber in the stash waiting to be built, and I’m wondering now about attempting a camo pattern on it! That could be a lot of fun.
So …
Can you paint Metal Earth models? Absolutely. I’ve finally answered that question to my own personal satisfaction and I would really encourage anyone who has built a few metal models to have a go at it.
Have something to add? A question about anything I’ve written, or a suggestion for other techniques? Leave a comment below.

Looks great! I was considering painting before putting it together, as that it how I paint plastic army miniatures, but your experience shows that the tabs still fit!
Great advice, especially about the sanding. I appreciate that you took on this task and wrote about it!
Thank you for your efforts!
Thanks Doug. Let me know how it goes when you try painting one!