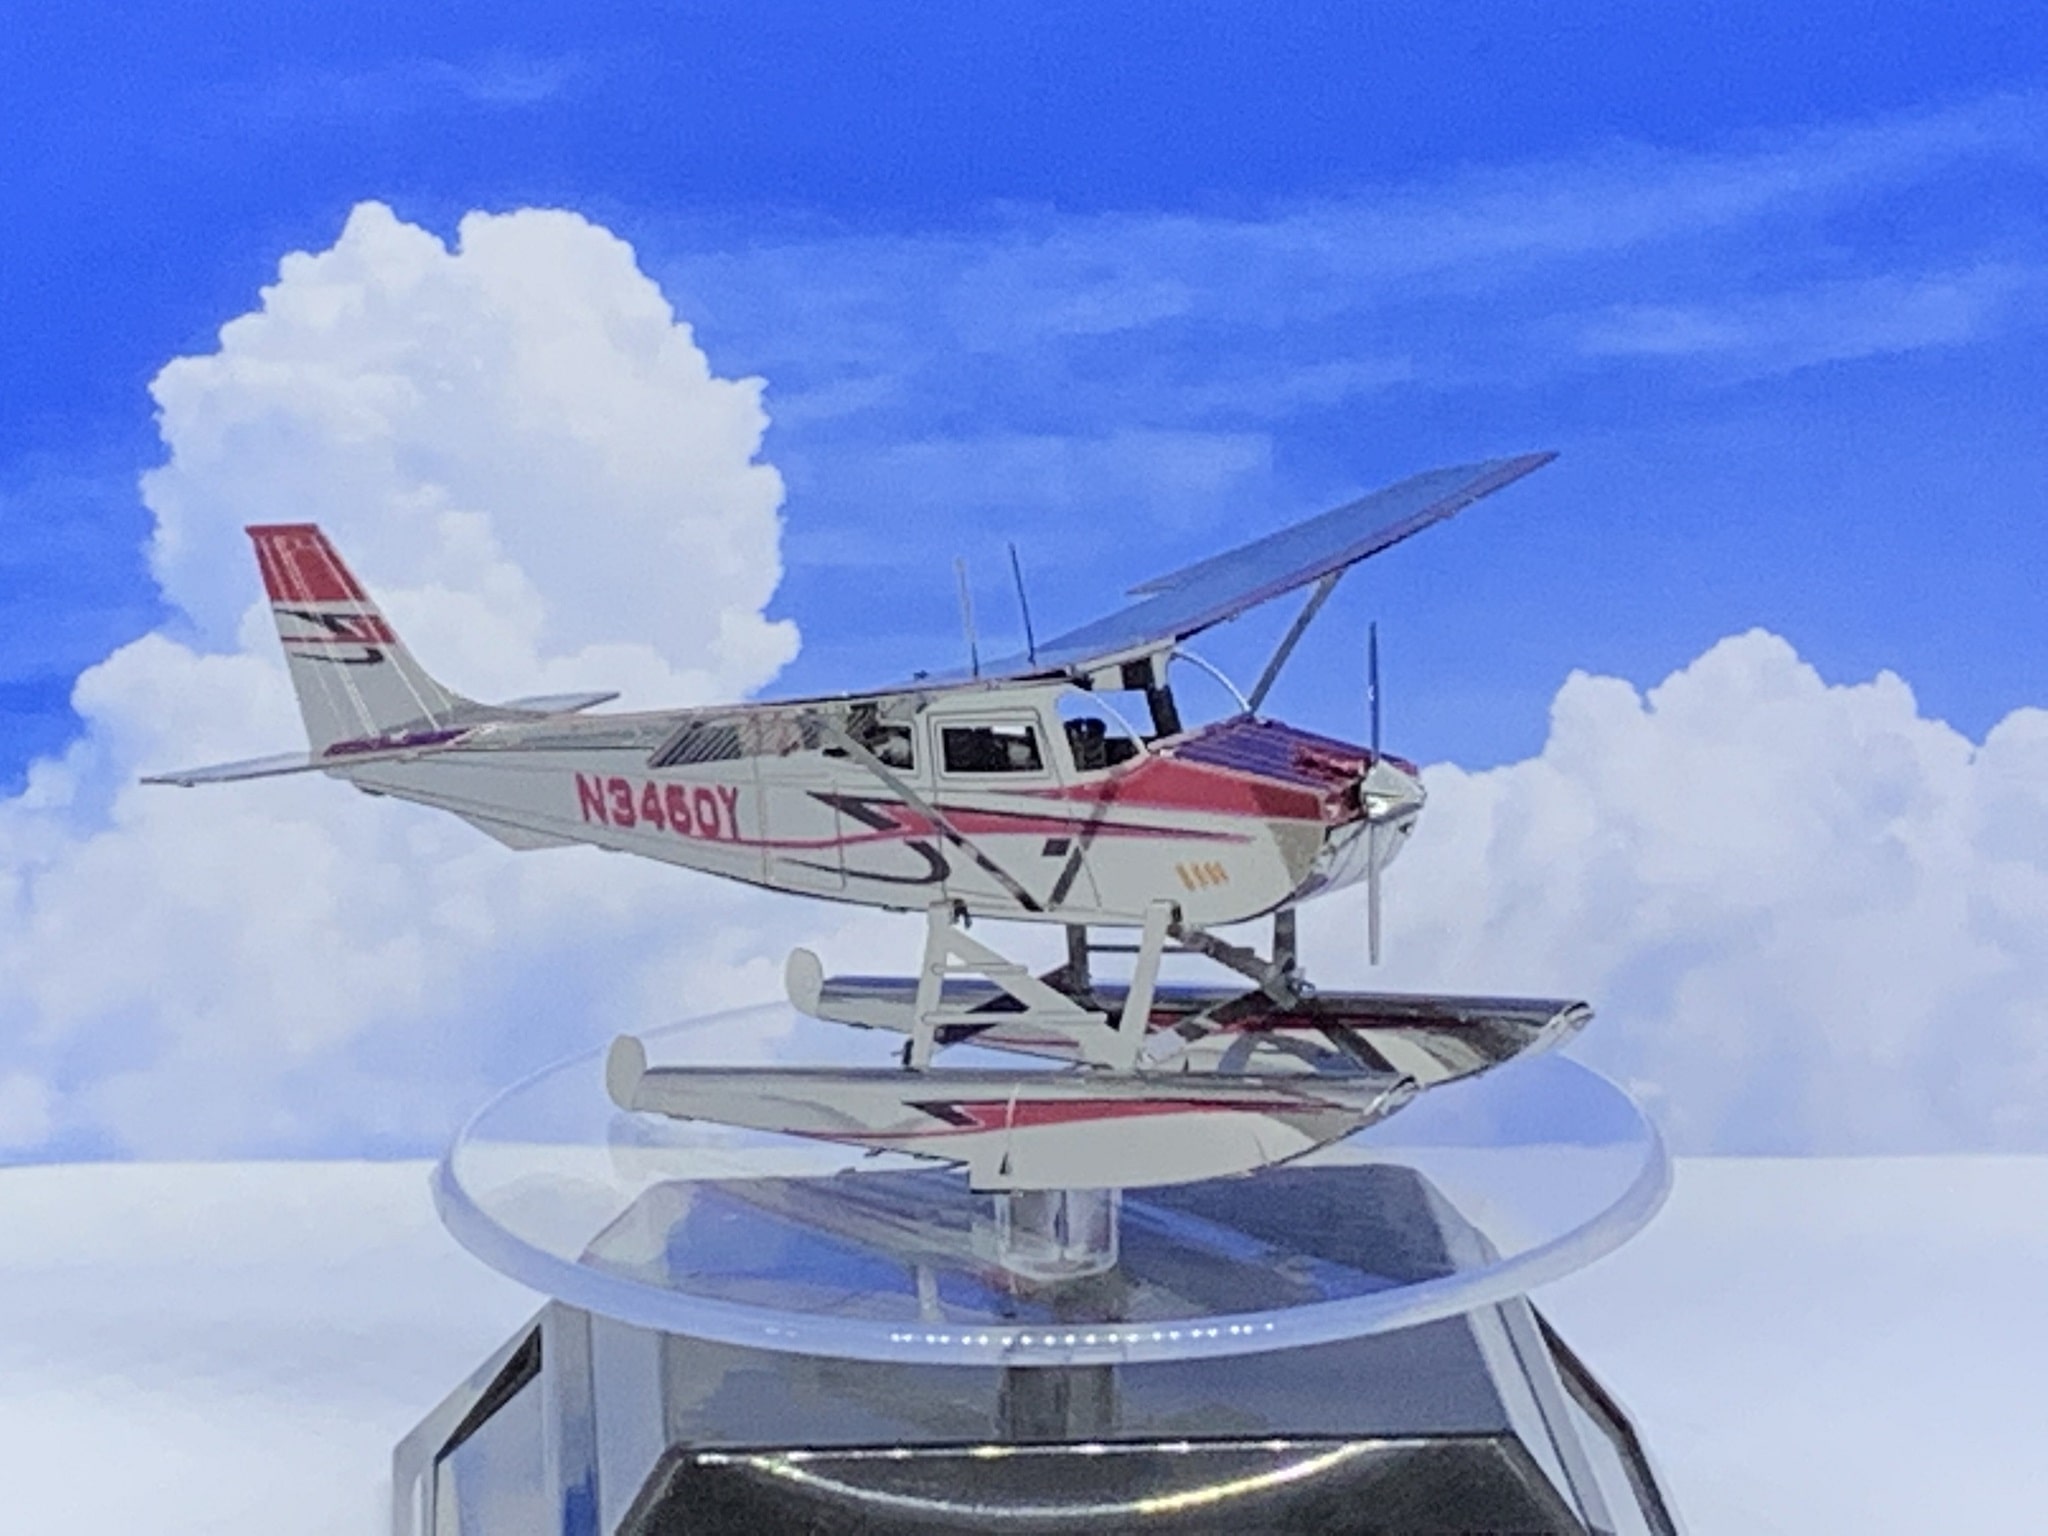
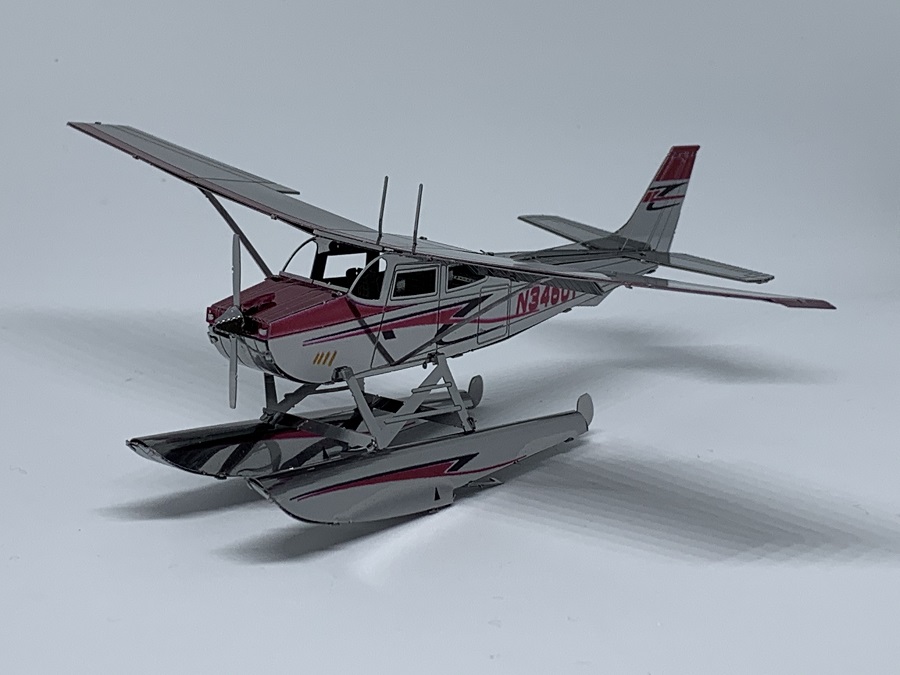
When the Metal Earth Cessna 182 Floatplane kit was released and I saw it for the first time, I immediately knew that resistance was futile. It looks spectacular on the package art. And when I finally got around to building it, the finished model does not disappoint!
[Click Here to see the kit at Innovatoys]
The offerings by Metal Earth just keep getting better and better. The Cessna Floatplane kit has been out for about a year at the time I’m writing, but it is still one of the new generation of models that, among other things, features the use of color to stunning effect.
It’s not just the addition of color, however. These models have improved at the level of design and engineering: the level of etched details is extraordinary, and the fit of the parts as they come together is superb.
These advances in kit quality are coinciding with the fast growth of the audience building them. All of this bodes very well for the future of our hobby in the years to come.
The Real World Floatplane
 From the back of the Metal Earth package:
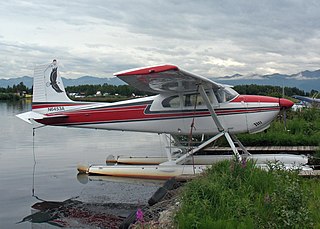
Cessna 182 Floatplane is a four-seat light aircraft with fixed landing gear that is powered by a 230 hp Continental engine. The plane was designed as the tricycle gear variant of the Cessna 180. Designed with additional cabin space, it has become a popular floatplane for supplying towns and villages in remote areas.
The popularity of this series of aircraft has endured. Cessna built the first 182’s in 1956. The type remains the second most popular Cessna after the ubiquitous 172. (More 172’s have been built than any other civil aircraft.)
The choice of the floatplane variant for this model makes it all the more interesting as a subject.
Now, for any purist civil aviation fans out there, there is one sticking point that may irritate you. The good people at Fascinations (makers of Metal Earth kits) chose to use the registration number N3450Y on the side of the aircraft. But a quick search online reveals that N3450Y is actually a 1968 Cessna 180H Skywagon.
However, for most of us who just love a good looking model, that’s not going to matter at all.
Building the Metal Earth Cessna 182 Floatplane
 The kit package contains two crisply detailed metal sheets, and a single double-sided A3 instruction paper. These instructions are mostly quite straightforward. They are in English, which is a benefit of Metal Earth as opposed to some other brands of 3D metal models.
Tip: The first step I always take is to photocopy the section of the instructions that shows the exploded diagrams of the metal sheets labeled with part numbers. I cut them out of my photocopy and paste them on the wall right next to my hobby desk. That way I don’t have to keep turning back to that page on the instructions.
Starting with the interior
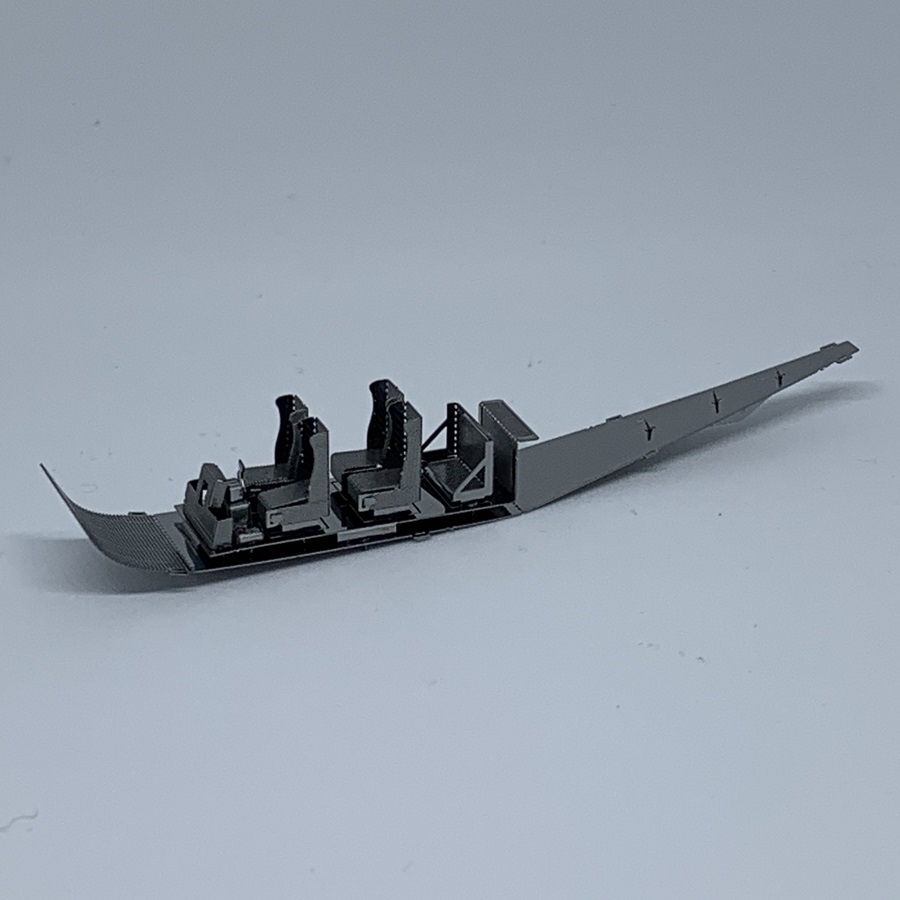
Construction begins with installing the seats and other interior details to the cabin floor. This is laid out in five steps that are all illustrated on page 2 of the instruction sheet.
This part of the build presents no real difficulty at all. First time builders might wonder (1) how much angle is required for the tail end and (2) how much rounded shaping is needed on the front. Don’t stress about it too much; it’s honestly just a guesstimate at this stage. Eyeball it from the plans. Later, when you come to attaching the sides, you’ll be able to adjust it.
Attaching the sides and floats
Turning over to page 3 of the instructions, we come to attaching the sides of the aircraft to the cabin floor sub-assembly that we’ve already built. Again this continues quite easily.
Next are the struts that will hold the floats underneath. No drama.
Then we get to the floats themselves, and our first points of challenge. Nothing too difficult, but you do need to take care …
The top of the floats need to be bent to shape, and you’ll need some sort of cylindrical object to do this. I used the handle of one my mandrels, but any rod or dowel you have around the house with about a 1/4 inch diameter will work. The most important thing is to bend both floats so that they look the same.
Again, you don’t need to get too worried, because the underside of the floats (part #20) will pull the tops into the correct size and shape when you attach them.
But then we get to …
Those float rudders!
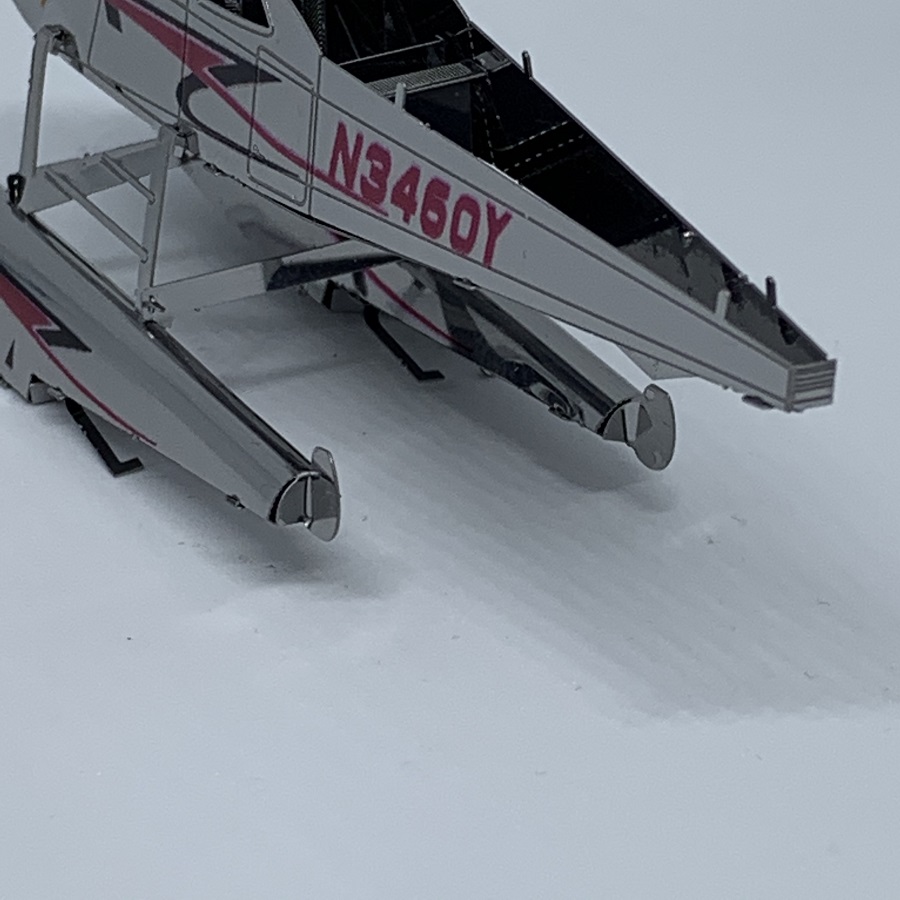
The Metal Earth instructions are not really clear about how the rudders (parts #17 and #18) are to be folded. They seem to indicate two bends, but in fact three are needed …
- Twist the rudders themselves 90 degrees. For the first float (part #17) this will be a twist to the left, looking at it from the rear. For the second float (part #18) it will be a twist to the right, looking at it from the rear.
- Bend the semi-circular “end caps” down into place, enclosing the hollow floats.
- Next is the step that’s not clear from the plans. You then have to bend the rudders back up into their final position. (See photo).
Hood and propeller assembly
Turning the page again, page 4 begins with the hood and propeller. Part #21 is TINY, and you have to bend it into a half cone shape. I have a very small steel mandrel that I used to bend it around. Other household objects you might consider would be the writing end of a very fine pencil, or the ferrule of a very fine hobby paintbrush (the kind used for detailing figures). But be careful — tiny pieces like this can easily flick from your fingers and be eaten by the carpet monster!
The propeller itself (part #23) is also small, and you have to bend the nose cone into shape, bringing five triangular sections together. You can do this with tweezers; just make small adjustments and bring the pieces together little by little.
The wing … in two pieces
Here’s where I actually made a very silly rookie mistake. Be careful not to do the same.
On the third panel of page 4, you are instructed to mount part #28 (the wing). BUT PLEASE NOTE that this is only the lower surface of the wing. In the next step you will add part #30, which is the upper surface.
The thing that can fool you, if you’re not paying attention, is that the Cessna 182 Floatplane is a “high wing” aircraft. The wing is fixed above the cabin for maximum earthward visibility. When you come to attaching part #28, it feels natural to want to place it with the detail facing up. But this part is NOT the upper surface; it’s the lower surface, and needs to face DOWN. The instruction sheet is not at fault; it clearly has an “NE” symbol correctly showing that the non-engraved side faces up.
I admit it. I mounted it wrong, which subsequently meant that I bent the two aerials in the center 90 degrees the wrong way. The problem with doing so was that, after I corrected the mistake by turning part #28 over, I had to bend those fine aerials back 180 degrees the other way. It could have led me to snapping them off. Fortunately, I got away with it.
After that, the rest of the build was easy and proceeded with no drama.
Conclusion
The Metal Earth Cessna 182 Floatplane kit makes a beautiful looking model that I’m thrilled to add to my collection (and even to my “Favorite Models” page!) You can see the finished result in the short video below.
The skill level meter on the side of the packaging rates this kit as a 4 out of 10 for difficulty. That’s about right. I wouldn’t hesitate to recommend this to anyone — even beginners.
[Click Here to get one for yourself at Innovatoys]
Did you find this build report helpful? Anything to add? Leave a comment below.

Leave a Reply